The thought of setting up a printer intimidates many people. Have you ever wondered how you can connect your Mac to a new printer? Then you are in the right place. There are numerous methods that you can use to add and delete network printer to Mac successfully.
This post will highlight some of them while guiding you through each step. Once you know the steps, it is relatively easy to do. The steps will come in handy on many occasions. So, whether you want to add one printer or lots of printers to a business network, you will know-how. Read on to learn more on how to add New printer to Mac.
How to Connect a Wireless Printer to Mac
This is a step-by-step procedure on how to add a new printer to Mac using the printer’s IP or DNS address. These two addresses differ in that the IP address is subject to change, and this will result in your printer not working while the DNS address remains the same throughout. The printer’s manufacturers always include documentation on how you can retrieve either address. It would be best if you referred to those instructions and then follow through with this procedure. Also, you may have to preinstall some drives depending on your printer.
How to Connect MacBook to Printer Wirelessly
Below are the steps on how to connect the MacBook to a printer wirelessly.
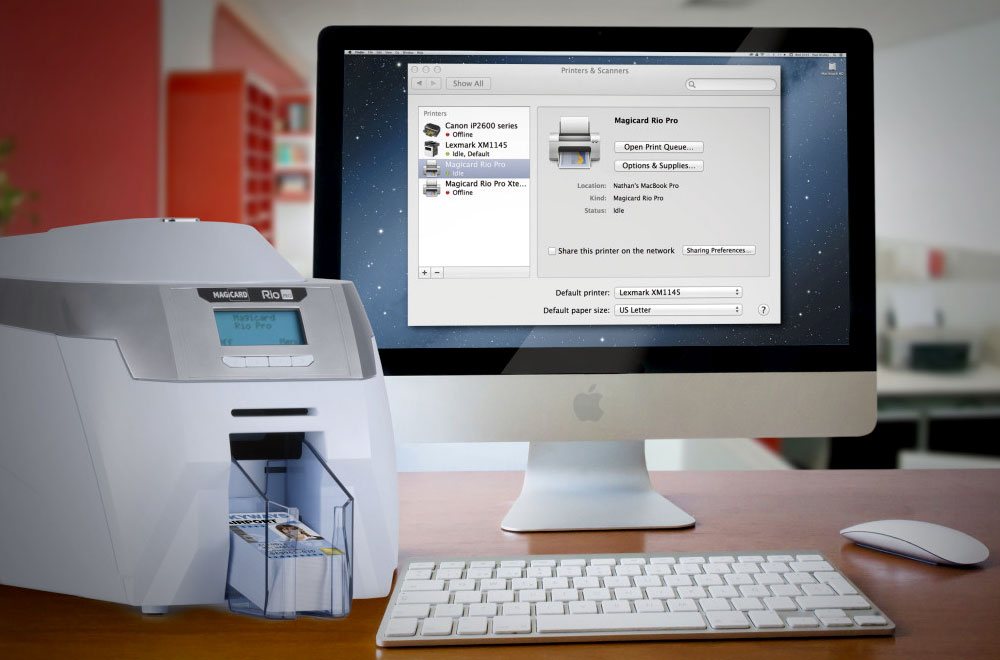
- The first step is to click on the Apple symbol, usually on the top, left-hand corner, and select system preferences.
- From there, click on the Printers and Scanners icon, after which you are required to click the ‘+’ sign and add the printer.
- This opens a new window. Here, you are required to click on the IP icon that is at the top and then fill out the information required.
- Afterward, you can add the printer to your Mac. You should be able to see it on the printer’s list once configured.
- You can confirm the printer’s functionality by printing a test page.
The same procedure can be used to get your Mac to identify your printer.
How to Add a Network Printer on a Mac
Below are the instructions you can use to connect your UMD network printer to your Mac.
- You are required to find out the name of the printer that you intend to add. The names are usually indicated on a label affixed to the printer.
- Afterward, click on the Apple menu, select System Preferences, and then click on Printers and Scanners. To add the printer, click on the + sign.
- From here, you are required to click on IP and fill in the full name of the printer.
- There will be a Use drop-down menu that should select the correct drivers for the printer model automatically.
- In case you select Generic Printer by default, you should try changing the Protocol setting and then re-select Auto-select from the Use menu.
- Ensure that both your printer and your mac device are on and naturally connected to the network.
- You can also try choosing Select Software and look for the model of the printer on the list.
- Once you are done, and the Options box will pop up.
- The icon should look like your printer, and then click OK.
How to Add a Printer to Mac via WPS
This process will require you to press the Wi-Fi or Wireless button on the printer and then the WPS button on your router. The steps may, however, vary slightly depending on the router and printer that you have. Therefore, you are required to check the user guides for any specific instructions. Once the WPS is set up, you can proceed to the following steps.
- The first step is to click on the Apple symbol on the top left corner of the screen.
- Afterward, click on system preferences and then click on Printers and Scanners.
- From here, click on the + sign to add your printer.
- The mac device will display a list of discoverable printers on the network; click on the one you intend to add.
- Afterward, you are required to choose the printer’s software or the driver in the Use menu and finally click add.
- Your printer will be added to the list of printers. The procedure is the same if you are looking at how to add a Wi-Fi or network printer.
How to Add a USB Printer to Mac
The printers that do not have networking capabilities can be added via a USB or any wired connection. Some printers still need a USB connection as part of the setup process, even though they support wireless printing. Here’s how you can add a printer using USB.
- Firstly, plug in the USB of the printer to your Mac device.
- The Mac will automatically detect the USB-connect printer and download the required software.
- However, if that is not the case, you can move on to the next step.
- Click on the Apple menu, system preferences, and then Printers and Scanners.
- From here, click on the + sign that will be below the printer’s list.
- Select the printer you intend to add from the list of discoverable printers on the network.
- Look for the one with a USB listed under the column for Kind and then click add.
- The printer will be listed on the left-hand side of the Print and Scan window.
How to Add a Bluetooth Printer
If your Mac came with Bluetooth installed or have a USB Bluetooth adapter, you can easily print wirelessly to a Bluetooth-enabled printer.
- On your Mac, select the Apple menu, system preferences, and then Printers and Scanners in that order.
- From here, click on the + sign and then the default printer button.
- There will be a printer list from which you select the printer you intend to add, and then click add.
- If your printer does not appear on the list, enter its name on the search field, and click on Return.
- Ensure that you have the latest Bluetooth driver for the installed printer.
How to Delete Printer from Mac
If you are no longer using a specific printer, you can remove it from your printer’s list. Here’s how.
- On the Apple menu, select system preferences and then Printers and Scanners.
- Select the printer you intend to remove on the list, click the Remove button, and then click delete printer.
How to Remove Printer Software from Mac
Once you delete a printer, the driver will still be taking up space in your hard drive. Here’s how you can remove the printer software from your Mac device.
- Click on the Apple symbol and then system preferences.
- Next, select the Print and Scan icon on the hardware section. Click on the printer you intend to remove to highlight it, then click on the – button below the list of printers to remove printer information.
- Close the print and scan window and then click on the Finder icon.
- From here, select your hard drive in the menu, click on Library, printers, PPDs, Contents, and Resources. A list of printer drivers on your device will appear.
- Afterward, click and drag the name of the model driver of your printer into the trash can.
- Press and hold the Control button while clicking on the trash can icon and then select Empty Trash.
Conclusion
Adding a new network printer on Mac may not be an easy task for many. But we have made it easier. The article above has outlined various ways on how to install a printer on Mac. You can now easily do it on your own without any help.